Saturday, 29 November 2014

What to do with fabric scraps: make fabric bookmarks!

Being an English student, I'm always reading several texts at any one time. Marking my pages with tabs/post-it notes is kind of boring, so I decided to put my fabric scraps to good use and make them into pretty bookmarks.

What you'll need:
  • A fairly large-ish scrap of fabric 
  • Some medium-weight fusible interfacing
  • White thread, a needle...and a sewing machine of course
**I'll apologise now for the inconsistencies in lighting - living so high up with an oddly placed window and sloping roof (I'm basically in the loft!) means I was totally subject to the variations in light/shade whilst making this!**

1. Here's my scrap of fabric. It's got some pretty odd shapes cut into it!


2. Create a paper template. I found this squared paper on the side of my desk after laminating some of my books which helped with the straight lines. Pin it to your fabric and cut out. (When placing it on the scrap, make sure it isn't on the bias as this will stretch your bookmark when it comes to sewing and it won't lie flat when finished!)


3. Cut out a piece of interfacing using the template. You should have two fabric pieces and an interfacing piece.


4. Pin the fusible interfacing to the wrong side of one of the fabric pieces, and iron it. Pin the interfaced fabric piece to the other fabric piece, wrong sides together. Measure out a 0.5cm seam allowance, and sew.

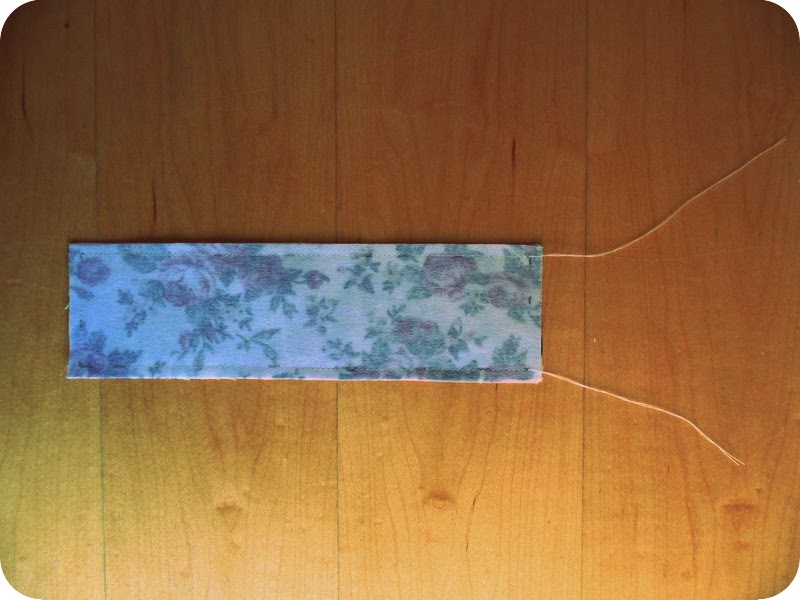

 5. You should be left with something like this when you've finished sewing all the way around, but be sure to leave a gap at the top so you can turn it inside out.


6. On the bottom end of the bookmark, cut diagonally parallel to the points, and then again on the sides of this to remove the excess seam allowance. This will help to achieve a pointier finish once turned inside out.


7. Turn it inside out. I used a ruler to get the corners and edges as neat as could be, before pressing it with my iron to set the seams. Fold inside the top end of the bookmark, ensuring that it is as level as you can get it. This is definitely the most fiddly part! Pin it once you reach a level of straightness (or get so tired playing about with it that you just want to move onto the next stage, as I did)

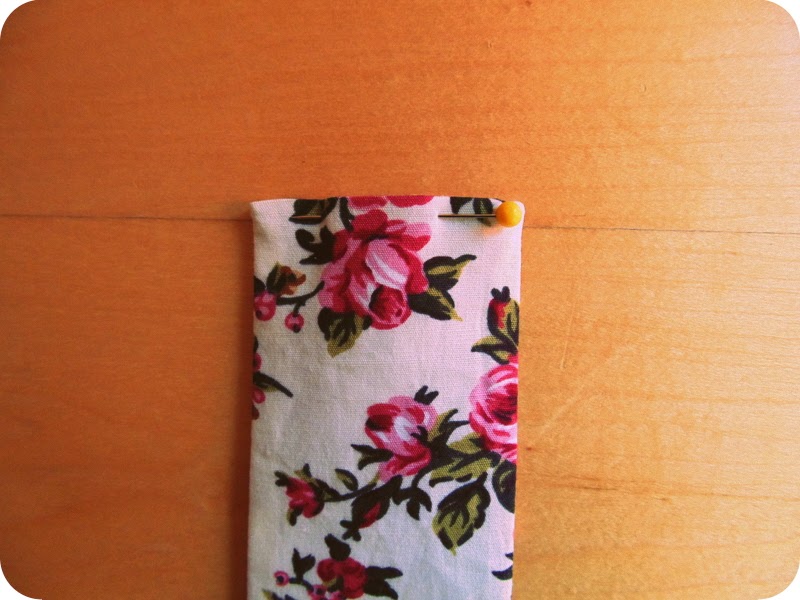

8. I don't really know how to describe this stitch...it's similar to a slip-stitch (I think). Using a needle, thread it through one side of the fabric closing, being careful to catch only the interior part of the fabric and not the visible outside part of the bookmark. Pull the thread through, then flip the bookmark over to the other side.


9. Do the same thing, pushing the needle a little behind from your previous stitch and pulling it through. Try to make sure your stitches are of an even spacing for neatness and consistency.


10. Press the edges of the bookmark to set the hand-sewn seam you've just created.


Here's some bookmarks that I made for a friend. So many prints! I decided to topstitch them. This is a great finishing technique, but isn't essential and they look nice either way.


Also - a purse made from some fabric scraps, too. Waste not, want not, and all that. The print reminds me of some kind of abstract artwork. I kind of wish I owned a painting of it.


SHARE:

Saturday, 15 November 2014

Picking up abandoned sewing projects with confidence

As much as I love sewing, there are times when you hit an obstacle and throw the thing to one side in sheer exasperation. I got halfway through a shirt last year before abandoning it because the collar didn't fit. It's been taunting me in its unfinished, hacked state ever since, and I haven't been able to buy new fabric without a guilty conscience. Starting something and giving up on it halfway through is so wasteful - of time, money and energy alike.

It's a miracle that this was even finished - not only had I lost the pattern and instructions, but my beloved machine broke half through (only it turns out it didn't - it was just the lightbulb that had blown! The pedal was working fine but I never checked, haha oops)

Here's what the shirt looked like when I resurrected it from its sartorial grave: 


      No collar, no cuffs, no buttons or button holes, and unhemmed. 


            I cut up the existing collar I'd made ages ago in half. I traced around it to create a template, added a 1.5cm seam allowance, and cut out the pattern pieces.


   Here's the finished collar in all it's glory. Drafting a collar was much easier than I anticipated, I don't know why I was so scared!


    This was the only cuff that I found. I made another by tracing around it and creating a template, as I did with the collar:


 I sewed a 1cm seam allowance on each side, trimmed the corners and turned it inside out ready to be attached to the sleeve.


   I then pinned some small pleats by the wrists and sewed.


After stitching the cuff to the wrist, I encased the raw edges on the inside. This was the hardest part as the pins resisted all orders to lie flat!


It was only when I got to the point of sewing the buttons on that I realised I had no black buttons to hand! So I raided my button jar and found these tacky faux-gold anchor ones and used them instead.


The ones on the cuffs are from an old dress and don't match the anchor ones, but who cares. You can just about make out the lovely pleats in the cuff which I'm very happy with. (Also, who knew that the tumble driers in the laundrette downstairs left so much lint on my clothes? I never realised before as I don't own a lot of dark clothing *immediately gets lint-roller out* )


...and here it is in all it's glory! I'm currently working on a floral-printed version of the above skirt; hopefully I'll be able to blog a tutorial about it next week, silly uni schedule permitting.  


SHARE:

Thursday, 21 August 2014

DIY: Collage-covered diary

I've always been slightly obsessed with notebooks, journals, diaries and scrapbooks since I was a child. I have also long-loved the haphazard look of collage, so spent one sleepy Sunday beautifying my academic year-planner in preparation for going back to uni in September. Hopefully if it looks pretty then I'll be more inclined to actually use it...


I started with a plain black diary from WHSmiths. It's quite chunky as it's a day-by-day one.


I had a browse through my stupidly large magazine collection and tore out a few pages.


I then cut lots of pieces out before deciding on which ones I wanted to use.


I began arranging the pieces in the cover...and then had a brainwave.


RED PAPER! I covered the diary in vibrant red paper. Sometimes you get ideas as you go along, and that's what I love about making things - you never know what the outcome is going to be because inspiration strikes unexpectedly!


I drafted a quick handwritten sign but decided to go with the collage theme and use cut-out letters instead. 

Here's the front:


And the back:


I laminated the whole thing to secure the pieces and prevent the corners from wearing away. I'm really pleased with it :) 


SHARE:

Thursday, 14 August 2014

TRAID Rucksack inspiration - reusing old fabric for new things

I have a lot of projects in my sketchbook and there's no set way of tackling what I want to make first. More often than not, my selection process revolves around what I need, and right now that's a bag. I'm fed up of buying bags from the shops and having them break within a couple of months (maybe this says more about me than the bag!), so I've made a bag from an old vintage dress I've had for ages. This is also inspired by TRAID, who have recently posted about reusing denim to make rucksacks. You can read the post here: http://www.traid.org.uk/transforming-denim/ 

Here's the dress on my dressmaker's dummy: (Gotta love the smudgy pic! Forgot to wipe the lens. I am such a novice)


You can see how massive it is, which is great as there was more fabric to play with! It's made out of a
thick heavyweight cotton which is perfect for this project, as a rucksack needs to be made of a more stronger, durable material.


I deconstructed the dress by cutting at the waist seam, and then the side seams of the skirt. I then ironed the separate panels of the skirt, placed the pattern pieces on accordingly, cut them out, and sewed them up! I was pleasantly surprised by how easy the instructions were to follow.


I used an old shirtdress made of a black and white apple print cotton to line it. I did the same as above - cutting the side seams of the skirt and pinning the pattern pieces to be cut.


    And here's the finished product!


I didn't just recycle the fabric - even the metal d-rings are from an old bag...


Here's an awkwardly blurry pic of the inside. The top corners are fastened with Velcro, but I'm not sure I like how pointy it makes it look. I might draft a drawstring closure for the next one I make to give a more rounded appearance.


...and the metal snap closure below is also from an old bag. A 100% recycled bag!


I'm pretty happy with this little delight and have plans to make another in faux suede with a pom-pom trim so watch this space!

SHARE:
Blogger template by pipdig